The fastest way to fix a green tint in a photo is to add magenta, because green and magenta are opposites on the tint axis of white balance. In almost every editor the same two moves work: use the white balance eyedropper on something that should be neutral — a white wall, gray pavement, a gray card — or push the Tint slider toward magenta until skin, white clothing, and neutral surfaces stop looking sallow. For a typical fluorescent or LED cast, that is the whole fix.
Most single-photo fixes take under five minutes once you know which slider to reach for, and the tool-by-tool steps below carry time estimates. If you want to remove a green color cast right now without installing anything, open the Matcha Remover workspace and drop the photo in. It runs entirely in your browser, applies a restrained color correction you control with a strength slider, and exports a new copy while your original stays untouched. The photo guide documents formats and limits. The rest of this page explains why photos turn green, the little color science that makes every fix click, and detailed steps for Lightroom, Photoshop, free apps, and video.
What you’ll learn
- Why fluorescent tubes and cheap LED panels photograph green while your eyes compensate
- The two axes of white balance — and why “tint toward magenta” fixes almost every green cast
- The fastest correction in this site’s browser workspace, Lightroom, Photoshop, GIMP, Snapseed, and DaVinci Resolve
- What a baked-in matcha filter can and cannot give back
- How to prevent the cast at capture with custom white balance, a gray card, and RAW
- The five mistakes that make a correction look worse than the cast
Why do my photos look green?
White balance fails under fluorescent and LED light
The classic cause of a green cast is gas-discharge lighting. A fluorescent tube looks white to your eyes but does not emit a smooth spectrum: the mercury vapor inside produces narrow spikes, including a strong green emission line near 546 nm. Your eyes compensate in real time; the sensor records the spike faithfully. Crucially, that green excess sits off the blue–yellow axis that ordinary color temperature controls cover, so no Kelvin setting can neutralize it — it needs a separate tint correction. Cheap and mid-range LED panels reproduce the same problem through their phosphor blends, and two panels that look identical to the eye can photograph with different casts. A quick diagnostic: in a per-channel RGB histogram, a green cast shows the green channel riding visibly higher than red and blue.
Mixed lighting
Camera white balance assumes one light source with one spectrum. A room lit by warm tungsten lamps on one side and green-leaning fluorescents overhead has at least two, and no single setting can correct both zones at once — balancing for one makes the other worse. The practical consequence: mixed-light green is local, not global. Global tint fixes one zone while wrecking another, so these scenes call for masked local adjustments, selective tools, or per-zone correction in video.
Tinted glass and green bounce
A cast can also come from what light passes through or bounces off. Shooting through a car windshield or ordinary architectural glass adds a green-cyan shift regardless of your white balance setting, because the glass absorbs more at the red end of the spectrum. And sunlight bouncing off grass, foliage, or a green wall arrives at your subject pre-tinted — which is why garden portraits often show green contamination in the shadow side of faces and in white clothing. That kind of green lives in specific hues rather than across the whole frame, so it answers to HSL desaturation of the green and yellow ranges rather than to white balance alone.
A deliberate matcha-style grade
Since mid-2026, many “why is my photo green” questions are not about lighting at all but about the matcha filter trend: a family of green visual treatments with yellow-green midtones, creamy compressed highlights, softened texture, and added grain. If a photo or clip was posted with the effect baked in, the color part of the look responds to ordinary correction, while smoothed or regenerated detail does not come back. The recovery section below covers what is realistically fixable.
The 60-second color science you need
White balance is not one control but two. Temperature moves color along a blue↔yellow axis and handles natural broad-spectrum light like sun and tungsten. Tint moves along the green↔magenta axis at right angles to it, and exists precisely because fluorescent tubes and many LEDs sit off the temperature line with a green or magenta excess. In Adobe’s convention — shared by Lightroom, Camera Raw, and Premiere Pro — Tint left adds green and Tint right adds magenta. So the mnemonic for every green cast is “tint right.”
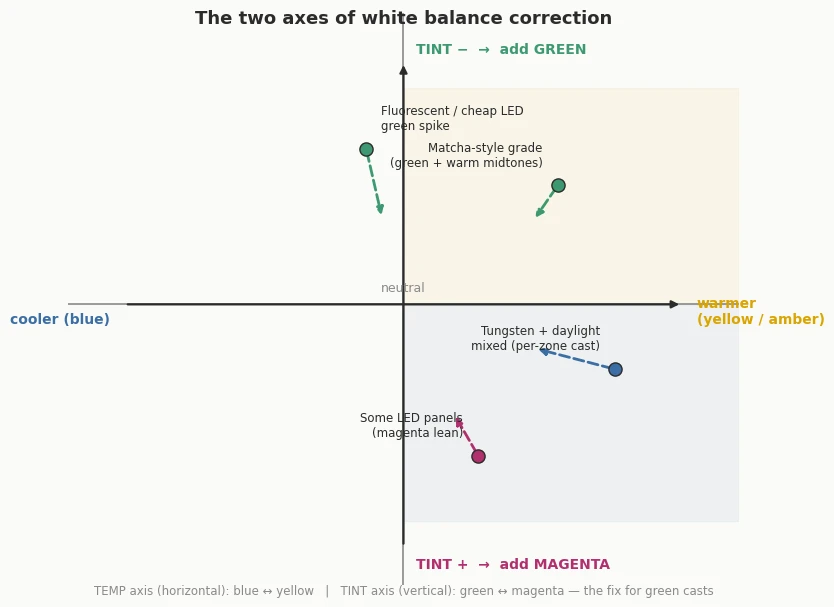
Underneath the sliders, every white balance adjustment is a per-channel gain on red, green, and blue. That is why channel-level tools work too: in Photoshop-style Levels and Curves, each channel pairs with its complement — red↔cyan, green↔magenta, blue↔yellow — so pulling the green channel’s midtones down adds magenta. And when the green is a specific hue in the scene rather than a global contamination, HSL tools desaturate just that hue range.
How to remove a green color cast, tool by tool
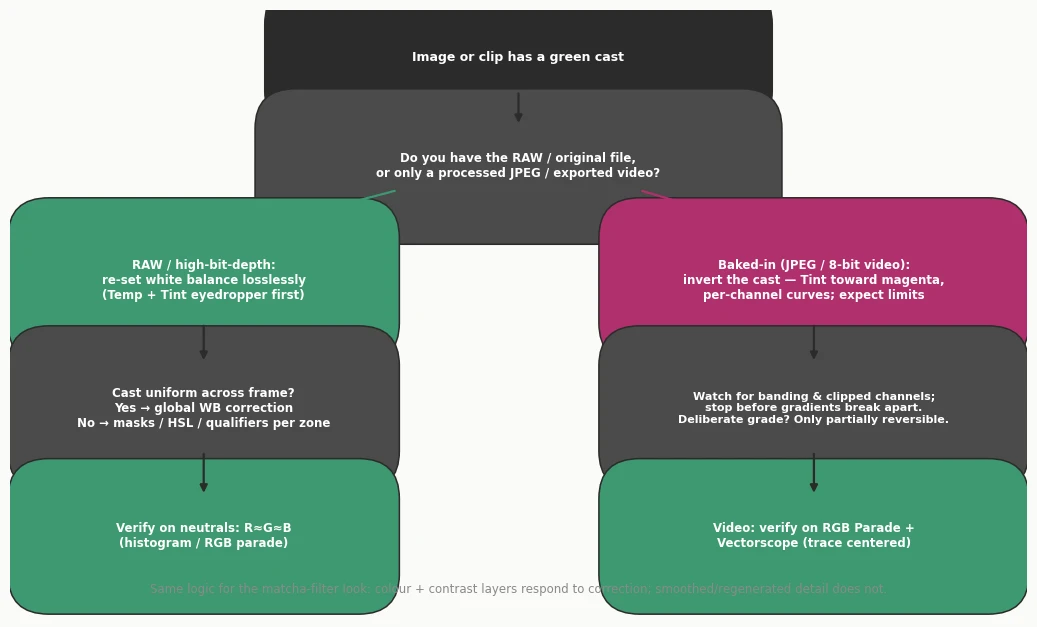
The decision logic is the same everywhere: if you have the RAW or original file, re-set white balance losslessly; if you only have a processed JPEG or exported video, invert the cast approximately and watch for banding; verify on known neutrals, not on memory.
Step 1 of 5 · The Matcha Remover workspace (about 2 minutes)
The matcha filter remover is built for exactly this job and needs no install or upload — files are processed locally in your browser. Open your photo, start with the Gentle preset, and watch a known neutral surface and a genuinely green subject at the same time. Increase strength gradually and stop when the neutral reference looks right, before real green subjects turn gray. Export a new copy (PNG avoids an extra compression step) and keep your original. For clips, the video remover applies your chosen settings consistently across every frame, which avoids the flicker that per-frame auto white balance creates, and it blocks an export that would silently drop your audio.

Pro tip: Judge the correction on a known neutral and a genuinely green subject together. If the green jacket or the leaves start going gray, you have pushed the strength too far.
Step 2 of 5 · Lightroom Classic and Camera Raw (about 5 minutes)
- In the Basic panel, take the White Balance Selector (keyboard shortcut W) and click an area that should be neutral gray — a wall with texture, pavement, a gray card. Avoid specular highlights.
- If green survives the eyedropper (typical under fluorescent and LED light), push Tint toward magenta. For a mild fluorescent cast, +10 to +30 on the RAW scale is a sensible starting region; heavy LED green or a matcha-style grade may need +30 to +60 with some contrast repair. Judge on skin and white objects, not on the numbers.
- Clean up hue-localized green in the Color Mixer: use the Targeted Adjustment tool to drag down on the offending area, which usually desaturates green and yellow together. Green saturation −20 to −50 with a smaller yellow reduction is a workable starting range.
- If only the shadows stay green, use the Shadows Tint slider in the Camera Calibration panel.
These behaviors are documented in Adobe’s Lightroom Classic documentation. Note that on a JPEG the Temp and Tint sliders compress to a −100…+100 approximation scale, because the original white balance is already baked into the pixels — one more reason to shoot RAW.
Pro tip: If an eyedropper click makes things worse, double-click the White Balance tool in the Basic panel to return to As Shot, then work the sliders manually in small moves. While hovering the eyedropper, pick a spot where the RGB readout sits as close to equal as possible.
Step 3 of 5 · Photoshop (about 5 minutes)
The fastest route is the gray-point eyedropper: add a Levels or Curves adjustment layer, double-click the Set Gray Point eyedropper, confirm its target is a true neutral (equal R, G, B values), and click something in the scene that should be neutral — Adobe’s own example is a paved road. The cast lifts automatically. For manual control, switch the channel menu to Green and pull the midtones down slightly; every downward move on the green channel adds magenta. The eyedropper method is documented in Adobe’s Photoshop documentation.
Pro tip: Apply every correction on an adjustment layer. It stays non-destructive and re-tunable, and a layer mask can confine the fix to just the fluorescent-lit half of a mixed-light frame.
Step 4 of 5 · Free tools: GIMP, Snapseed, and phone editors (about 5–10 minutes)
In GIMP, start with Colors → Auto → White Balance. For a measured fix, sample a should-be-neutral with the Color Picker, then adjust the Red, Green, and Blue channels individually in Colors → Curves until the sampled point reads as equal values; Colors → Hue-Saturation with the Green range selected mirrors the HSL cleanup. Use small moves — per-channel endpoints can clip a single channel even when the overall histogram looks healthy. In Snapseed (free, iOS and Android), open Tools → White Balance: try Auto, then drag Temperature and Tint manually or tap the eyedropper on a neutral; Tools → Curves exposes the individual channels, and the Selective tool places control points for mixed-light zones. Phone-native editors have warmth and tint sliders adequate for mild casts, but lack eyedroppers — move the file into Snapseed or Lightroom Mobile for anything beyond a light tint.
Pro tip: After per-channel curve or level moves in GIMP, inspect a bright gradient at 100% zoom. A single channel can clip into tinted highlights even when the master histogram looks healthy.
Step 5 of 5 · Video: DaVinci Resolve (about 10 minutes per clip)
Correct white balance in a dedicated early node, before any LUT or color space transform. On the Color page, the White Balance Picker eyedropper sets Temperature and Tint from a neutral click; the Temp and Tint sliders refine it — Tint toward magenta to kill green. For an overall cast in log footage, the Offset wheel moved away from green is the recommended tool. Hue-localized green, including matcha-style grades, answers to the Hue vs. Sat curve or an HSL qualifier. Judge on scopes, not eyes: on the RGB Parade a neutral object shows aligned channel heights, and on the Vectorscope the neutral trace sits centered. The full color workflow is documented in Blackmagic’s DaVinci Resolve Colorist Guide. Premiere Pro users get the same trio in Lumetri Color’s Basic Correction tab — WB Selector eyedropper, Temperature, and Tint — as described in Adobe’s Premiere Pro documentation.
Pro tip: Small moves go a long way. The Temp and Tint sliders pivot around the midtones, and big swings can push a channel into clipping — verify on the RGB Parade after each meaningful adjustment.
Removing a deliberately applied matcha filter
Everything hinges on whether the green look exists as metadata or as pixels. If the effect is still editable — a Lightroom preset on a RAW file, a social app draft where you can toggle the effect off — recovery is trivial and lossless: turn it off and re-export. If the look is baked into an exported JPEG or a downloaded video, you are approximating its inverse on compressed data, and some of what the original processing destroyed is gone.
| What the original processing did | Recoverable? | Practical approach |
|---|---|---|
| White balance stored as metadata (RAW, editable draft) | Fully, losslessly | Reset or re-pick white balance |
| Global color and tone shift, no clipping | Mostly | Tint toward magenta plus per-channel curves |
| Compressed “creamy” contrast | Partially | Re-expand black and white points with curves; expect banding in 8-bit |
| Clipped highlights or crushed blacks | No | Accept, or re-expose the midtones cosmetically |
| Smoothed texture, redrawn detail, injected grain | No | Only global color and tone can be naturalized |
Bottom line: if the green lives in metadata, you get everything back; if it lives in pixels, expect a visibly cleaner image rather than a true original. Correct gently, and always keep the unedited file.
A realistic de-matcha recipe follows that table: neutralize the green bias globally (eyedropper, then tint toward magenta), re-expand the compressed tonal range with curves, then desaturate surviving green hues selectively. Bit depth sets the ceiling — 8-bit phone video and re-encoded social clips band quickly when pushed, so correct gently in a single pass. A condensed starting point you can copy into any editor:
Matcha-style grade — starting-point recipe (verify on neutrals, then adjust)
Tint:        +30 toward magenta   # Adobe RAW scale; roughly half on the JPEG scale
Black point: down until shadows refit the histogram
White point: up until highlights refit the histogram
Green Sat:   -35                  # HSL / Color Mixer
Yellow Sat:  -15
# Every value is a heuristic mid-range start, not a target — [adjust to your image]
The field guide to the matcha filter explains the effect’s layers in more detail. And if the poster still has the original in their drafts, re-exporting without the effect is the only true fix; a remover tool reduces the visible treatment but cannot reconstruct an untouched original.
Prevention: never shoot green again
- Set a custom white balance. Place an 18% gray card where your subject is, lit by the same light, fill the frame, and store it as the camera’s custom white balance — or shoot one reference frame and sample it in post with the eyedropper, syncing across the shoot. In mixed light, make sure the card is lit by all the sources.
- Shoot RAW. A JPEG bakes white balance into 8-bit pixels; a RAW file keeps it as metadata you can re-set losslessly afterward, with a full Kelvin range no baked file offers. For video, 10-bit recording or log profiles preserve the grading latitude that 8-bit codecs discard.
- Control the light. Minus-green (magenta) gels on offending fixtures subtract the green spike before it reaches the sensor — a quarter-cut is the usual starting point. Under magnetic-ballast fluorescents, keep the shutter at or below one full mains cycle (1/60 s in 60 Hz countries, 1/50 s in 50 Hz countries) so flicker does not fragment the frame’s color. Shooting through tinted glass? Set the custom white balance through the glass before you start.
Common mistakes when fixing a green tint
- Correcting real green subjects. A green jacket or tree is a subject, not a cast. Judge the correction on something that should be neutral; if only the leaves are green, global correction may be unnecessary.
- Adding saturation before balancing. Saturation amplifies the cast along with everything else. Balance first, then decide whether the image needs a small saturation adjustment.
- One global setting for mixed light. If only part of the frame is green, a global tint will fix that zone and poison the rest. Use masks, control points, or qualifiers per zone.
- Pushing 8-bit files too far. Aggressive corrections on JPEGs and phone video open gaps in gradients that show as banding in skies and walls. Small, single-pass moves survive better than stacked extreme ones.
- Judging by eye alone on video. Human vision adapts to a cast within seconds. Trust the RGB Parade and Vectorscope: aligned channels and a centered trace are the objective signature of a neutral frame.
Questions about fixing green photos
Why do my photos look green indoors?
Indoor shots are usually lit by fluorescent tubes or LED panels whose spiky spectra carry a green excess your eyes compensate for but the sensor records. Auto white balance handles the blue–yellow axis well but often misses this green–magenta dimension, so the fix is a tint adjustment toward magenta.
What slider removes a green color cast?
The Tint slider, pushed toward magenta (to the right in Adobe tools). Green and magenta are opposites on the tint axis of white balance, so adding magenta neutralizes green. If your editor has a white balance eyedropper, clicking a neutral surface sets both temperature and tint at once.
How do I fix a green tint without Photoshop?
Free options cover the full workflow: GIMP’s Auto White Balance and per-channel Curves on desktop, Snapseed’s White Balance tool and eyedropper on mobile, or the Matcha Remover workspace in your browser, which needs no install and processes files locally.
Can I remove the matcha filter from a photo I downloaded?
Partially. The green color bias and compressed contrast respond to correction — tint toward magenta, then re-expand the tonal range. Smoothed texture, redrawn detail, and added grain are content changes that no slider can reconstruct, so the result is a cleaner interpretation, not the untouched original.
Can a remover tool always restore the original photo?
No. Color casts and compressed contrast can be neutralized, but detail that was smoothed away, redrawn, or clipped before export no longer exists in the file. Any tool — including this one — can only produce a cleaner interpretation of what remains, never the untouched original. This is why keeping your own unedited originals matters more than any correction.
Does fixing white balance in a RAW file lose quality?
No. White balance in a RAW file is stored as metadata, not baked into pixels, so changing it in post is lossless — equivalent to having set it differently in camera. This is the main reason to shoot RAW under tricky fluorescent, LED, or mixed lighting.
Why does only part of my photo look green?
You have mixed lighting: different zones are lit by different sources, and white balance can only target one of them. A global fix will correct one zone and shift the other. Use a masked local adjustment, Snapseed’s Selective control points, or per-zone qualifiers in video instead.
How do I fix a green tint in a video?
The same principle as photos: tint toward magenta, verified on scopes. In DaVinci Resolve use the White Balance Picker or Offset wheel in an early node and check the RGB Parade and Vectorscope. For a quick in-browser fix, the Matcha Remover video workspace applies one consistent correction across the whole clip to avoid flicker.
Will the green come back when I export?
No — a corrected export bakes your adjustment into a new file, and your original remains unchanged as long as you export a copy rather than overwriting. For video, keep the tab open until the download finishes and check the result, including audio, in the player you intend to use.
Is a slight green cast ever correct?
Yes. Green reflected from foliage or colored light in the scene is physically real, and removing every trace can make a photo look sterile. Correct until neutrals read neutral, then stop — a small residual cast that matches the scene’s mood is a legitimate choice.
Fix your first photo now
Start with the free browser workspace — open the matcha filter remover and drop a photo in:
- ✓ No install and no upload; files are processed locally in your browser
- ✓ A strength slider for partial correction you can dial back at any point
- ✓ Photo and video support, with one consistent correction across every frame
Prefer a full editor? The free route covers every platform:
- ✓ GIMP on desktop — Auto White Balance, then per-channel Curves
- ✓ Snapseed on mobile — White Balance eyedropper, Curves, and Selective control points
- ✓ DaVinci Resolve for video — WB picker, Offset wheel, and scopes, free for most grading work
Sources and scope
This page is an original explanation of documented color-correction behavior, written to match what the Matcha Remover workspace actually implements. Its technical references are the official documentation linked above: Adobe’s guides for Lightroom Classic, Photoshop, and Premiere Pro, and Blackmagic’s DaVinci Resolve Colorist Guide. Slider ranges and time estimates marked as starting points are practical heuristics drawn from those documented workflows, not manufacturer specifications — always verify a correction against a known neutral. Matcha Remover reduces a green cast and texture treatment in files you own or have permission to edit; it does not claim to reconstruct detail that the original processing removed.